
This guide walks you through the full transfer process step by step - so nothing falls through the cracks.
Why a Structured Handover Matters
In practice, many businesses discover too late that their GitHub repository, DNS settings, or even their Odoo subscription is registered under the integrator's account. A structured handover ensures you take full ownership of everything before the previous partner walks away.
Step 1: Confirm Ownership of Your GitHub Repository
Your Odoo.sh project is directly connected to a GitHub repository. This is where all your code lives - standard modules, custom development, configuration. If you don't own the repository, you don't truly own your project.
You should formally request that the repository is transferred to either your company's GitHub organization or a GitHub account that you own and control.
The previous integrator needs to initiate this from their side:
- Open the repository on GitHub.
Go to Settings (the gear icon near the top of the repository page).

- Scroll down to the General section.
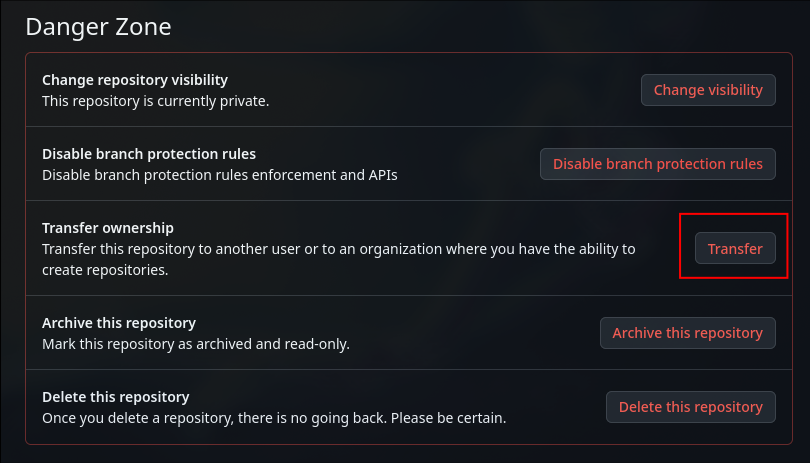
Under the "Danger Zone" at the bottom, click "Transfer"
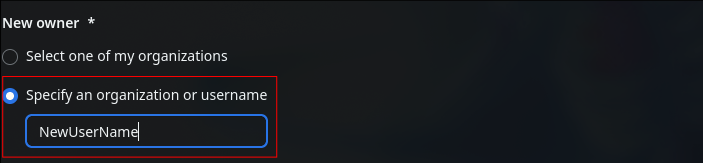
Enter your GitHub username or your company's GitHub organization name.
- Confirm the transfer by typing the repository name as prompted.
Once confirmed, GitHub will send you an invitation to accept the transfer. You must accept it for the process to complete. After acceptance, the repository URL will update to reflect your account or organization, and GitHub will automatically redirect the old URL for a limited time.
Make sure you verify that the transfer has completed by visiting the repository under your own GitHub account and confirming all branches and commit history are intact.
Step 2: Get Admin Access to Odoo.sh
Before anyone is removed, make sure you have full admin-level access on the Odoo.sh platform itself.
Request that your GitHub account is added as a collaborator on the project:
- Log into Odoo.sh.
- Open your project.
- Go to the Settings tab at the top.

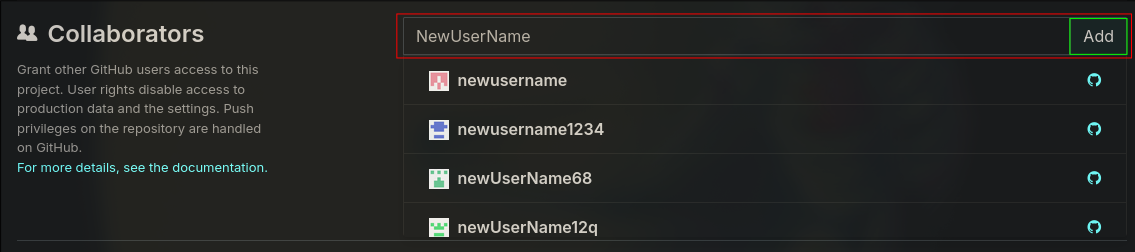
Under "Collaborators," enter your GitHub usernameclick, and click "Add."
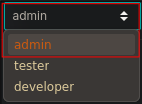
Set the role to Admin.
Once added, verify that you can:
- Access all branches (production, staging, development).
- View and download backups from the Backups tab.
- Manage project settings, including custom domains and workers.
- View build logs and shell access for each branch.
- Trigger new builds and manage deployments.
Do not proceed to the next step until you have confirmed every one of these.
Step 3: Remove Integrator Access
Once you have confirmed full access, it is time to revoke the previous partner's permissions.
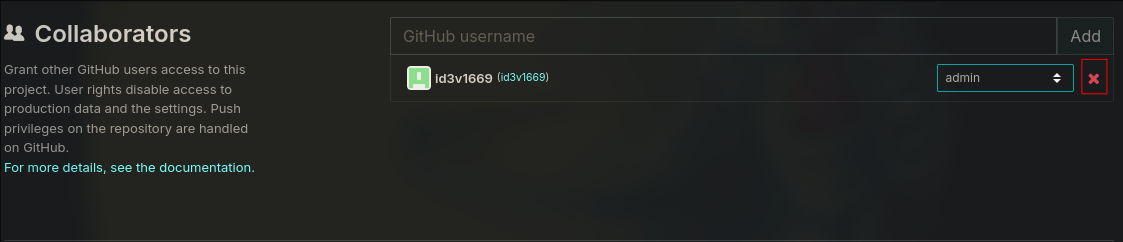
On Odoo.sh:
- Go to your project's Settings tab.
- Under "Collaborators," find the integrator's account.
Click the remove button next to their name.
On GitHub:
- Open your repository on GitHub.
- Go to Settings, then Collaborators and teams (under the "Access" section in the left sidebar).
- Find the integrator's GitHub account.
Click "Remove" next to their name.
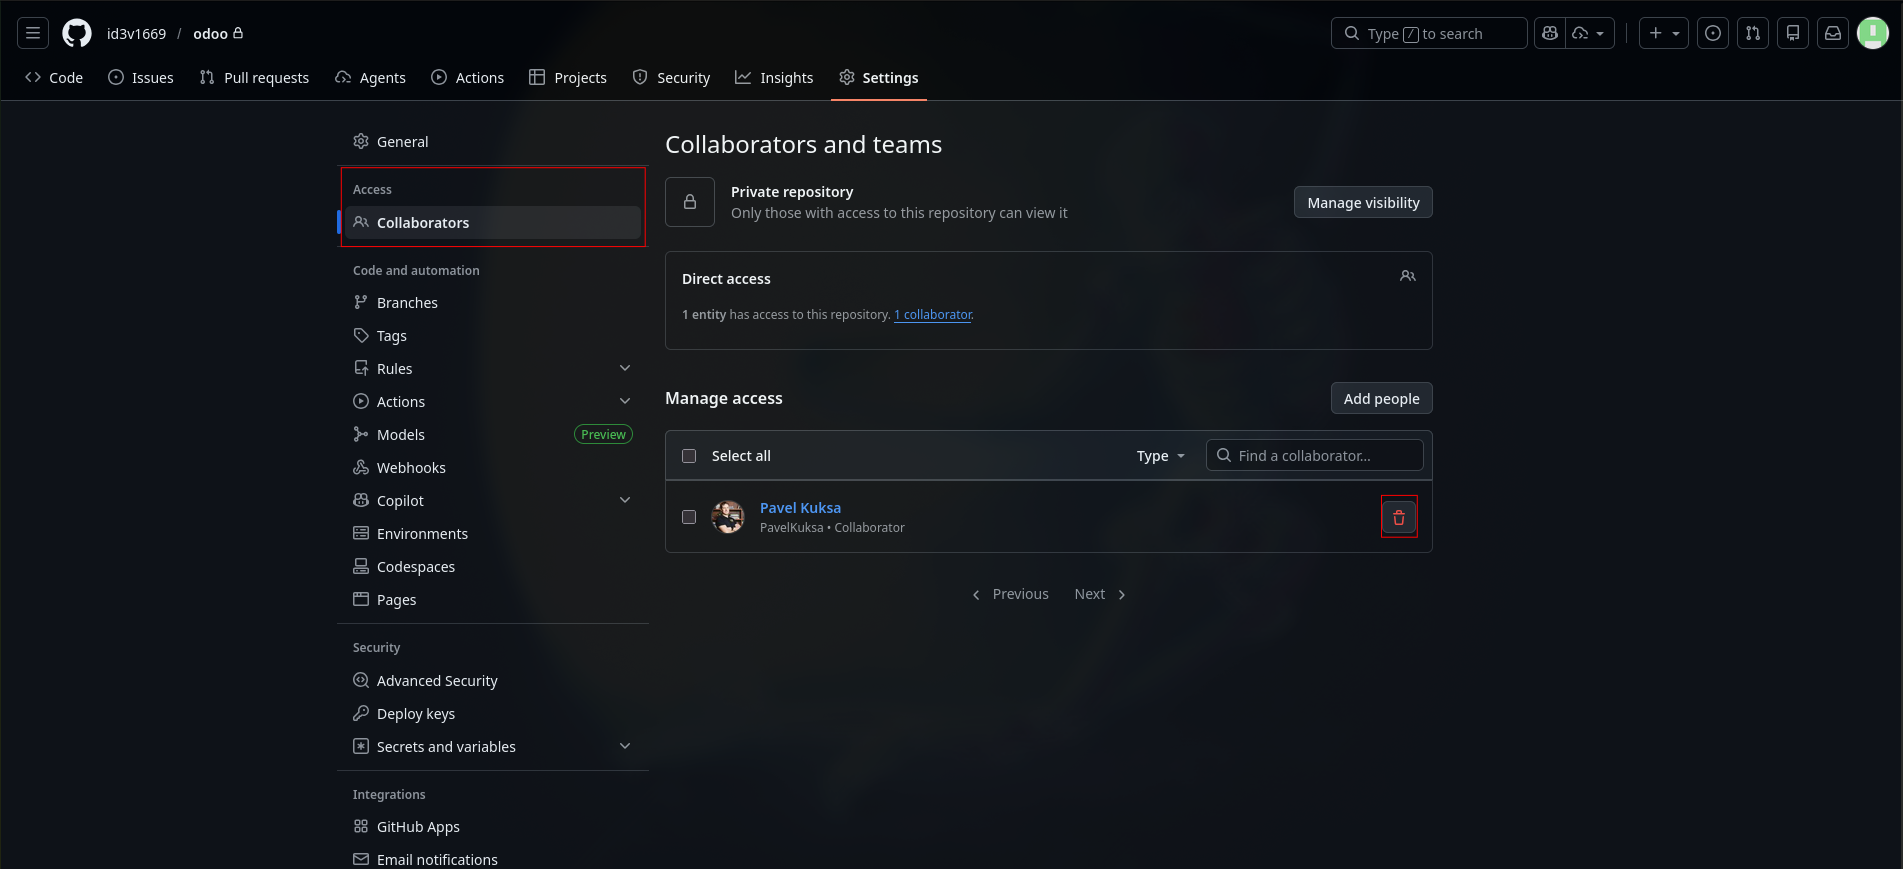
- Confirm the removal.
Step 4: Clean Up GitHub Repository Access
After the ownership transfer, you should audit everything connected to the repository to make sure no unwanted access remains.
Collaborators:
- Go to your repository on GitHub.
- Navigate to Settings, then Collaborators and teams.
- Review every account listed. Remove anyone who should no longer have access.
Deploy Keys:
- In the same Settings menu, go to Deploy keys.
- You should see one key labelled something like "DO NOT REMOVE - REQUIRED FOR ODOO.SH." This is the key Odoo.sh uses to pull your code. Leave it in place.
- Remove all other deploy keys. These may have been added by the previous integrator for CI/CD pipelines or other tooling that no longer applies.
Webhooks:
- In Settings, go to Webhooks.
- The only webhook that should remain is the one pointing to Odoo.sh. It typically has a URL like https://www.odoo.sh/api/github/webhook.
- Remove any other webhooks. These could be from third-party CI/CD services, notification tools, or other integrations set up by the previous partner.
Branch Protection Rules:
- In Settings, go to Branches, then Branch protection rules.
- Review any rules configured for your main branches (e.g. required reviews, status checks before merging).
- Decide whether these rules are still appropriate for your workflow. Remove or update any that reference the previous integrator's team or tools.
GitHub Actions and Secrets:
- In Settings, go to Secrets and variables, then Actions.
- Review any stored secrets. These may include API keys, tokens, or credentials that the previous integrator configured for automated workflows.
- If any GitHub Actions workflows exist (found in the .github/workflows directory of your repository), review them. Remove any that are no longer needed and rotate any secrets that may have been shared with the previous integrator.
Step 5: Collect All Technical Credentials
Your Odoo system likely connects to a number of external services. You need full access to every one of them.
Domain and Hosting:
- Domain registrar account credentials (e.g. GoDaddy, Crazy Domains, VentraIP).
- DNS provider access, especially if DNS is managed separately from the registrar.
Email Configuration:
- SMTP provider credentials (e.g. Mailgun, SendGrid, Amazon SES, or your own mail server).
- Outgoing mail server settings as configured in Odoo 19 under Settings, then Technical, then Email, then Outgoing Mail Servers.
- Incoming mail server settings, found in the same Technical menu under Incoming Mail Servers.
- DNS records for email deliverability: SPF, DKIM, and DMARC records. These are TXT records in your domain's DNS that control who can send email on your behalf. If the previous integrator set these up, you need to understand exactly what they contain and confirm you have access to modify them. Incorrect SPF or DKIM records after a transfer can cause your Odoo emails to land in spam or be rejected entirely.
Payment Providers:
- Stripe account credentials and API keys.
- PayPal account credentials and API keys.
- Any other payment acquirer configured in Odoo 19 under Accounting, then Configuration, then Payment Providers.
External Integrations:
- API credentials for any connected web services.
- Shipping provider integrations (e.g. Australia Post, StarTrack, DHL).
- Marketing tools (e.g. Mailchimp, SMS gateways).
- Any third-party connectors or middleware.
Monitoring and Logging Services:
- Check whether the previous integrator configured any external monitoring or error-tracking services such as Sentry, Datadog, or custom logging endpoints. If these services report to the integrator's own accounts, you will either need the accounts transferred to you or need to set up your own and update the configuration.
Odoo.sh Environment Variables:
- Some integrators store API keys, configuration values, or feature flags as environment variables on Odoo.sh. You can check these by opening a shell on your production branch. Document all environment variables and confirm you have the credentials or accounts they reference.
For each of these services, confirm that the accounts are registered under your company's name and email - not the integrator's personal or business account.
Step 6: Verify Your Odoo Subscription
Your subscription is tied to your project and determines your access to Enterprise modules, support, and upgrades.
- Confirm the subscription is registered under your company name on the Odoo portal.
- Verify the billing email and payment method belong to your company.
- Check for any unpaid invoices that could interrupt service.
- Request a copy of the subscription contract for your records.
You can review your subscription details at odoo.com/my/subscription.
Step 7: Secure Your Backups
Backups are your safety net. Before and during the transfer, make sure you have copies of everything.
Request from the previous integrator:
- The latest production database backup.
- The latest staging database backup.
- Any off-platform backups they may have stored separately.
- Details of their backup retention policy (how long backups were kept and where).
Additionally, download a fresh backup directly from Odoo.sh yourself:
- Log into Odoo.sh and open your project.
- Select the production branch.
- Go to the Backups tab.
- Click "Download" on the most recent backup.
- Store it securely in a location your company controls.
Do not rely solely on the integrator's copies. Always have your own.
Step 8: Secure Your Odoo Database
Once the transfer is complete, lock down access inside Odoo itself.
User Access:
- Go to Settings, then Users and Companies, then Users.
- Review the full list of users. Archive or delete any accounts belonging to the previous integrator's team.
- Reset passwords for the Administrator account and all active internal users. You can do this by clicking on each user and selecting "Change Password," or by using the "Send Password Reset Instructions" option which emails a reset link.
- Enable Two-Factor Authentication (2FA) for all admin-level users. In Odoo 19, each user can enable this from their own Preferences under the Account Security section.
Master Database Password:
The Odoo master password (also called the database manager password) is separate from any user password. It controls database-level operations such as creating, duplicating, or deleting databases. If the previous integrator set this password, change it immediately. This is configured in the Odoo server configuration file (odoo.conf) under the admin_passwd parameter, or can be set through the database manager interface at /web/database/manager.
API Keys and Access Tokens:
In Odoo 19, users can generate API keys for REST or XML-RPC access under their Preferences, then Account Security, then API Keys. Review all active API keys across all users. Revoke any that were created by or for the previous integrator, and generate new ones where needed.
OAuth and Social Login:
If your Odoo instance uses OAuth providers (e.g. Google, Microsoft) for single sign-on, review these under Settings, then Integrations, then OAuth Providers. Remove or update any that reference the previous integrator's OAuth applications or credentials.
Scheduled Actions and Cron Jobs:
- Go to Settings, then Technical, then Automation, then Scheduled Actions.
- Review all active scheduled actions. Some may call external URLs or services that are controlled by the previous integrator.
- Update or disable any scheduled actions that reference endpoints, webhooks, or services you do not control.
Email Templates and Company Details:
- Go to Settings and review the Company Details section. Make sure the integrator's contact information does not appear on printed invoices, reports, or email footers.
- Go to Settings, then Technical, then Email, then Templates. Review automated email templates for any references to the previous integrator, such as support email addresses, signature blocks, or links to the integrator's website.
External Monitoring:
If monitoring or error-tracking tools like Sentry were integrated into your Odoo instance, check the system parameters (Settings, then Technical, then Parameters, then System Parameters) for any URLs or API keys pointing to the integrator's monitoring accounts. Update or remove them.
Step 9: Collect All Documentation
A proper handover includes documentation. You should receive:
- Technical documentation covering the system architecture and any customisation.
- A complete list of custom modules developed for your project, with descriptions of what each one does.
- A list of third-party modules installed, including version numbers and sources (e.g. OCA, Odoo Apps Store, or private repositories).
- Deployment instructions - how the system is built, any special build steps, and environment variables.
- An overview of the server architecture, including worker counts, cron settings, and any custom system packages.
- Access to any project management boards, GitHub Issues, or task trackers where development history is recorded.
This documentation is essential for your new integrator to pick up where the previous one left off without unnecessary delays or guesswork.
Step 10: Audit Custom Code Ownership
This is an important step for both legal and operational reasons.
- Confirm that all custom modules developed for your project belong to your company. Check any contracts or agreements with the previous integrator to verify intellectual property terms.
- Identify whether any modules installed in your system are proprietary to the integrator and licensed rather than owned by you. If so, you may need to replace them.
- Review the codebase for any hardcoded references to the integrator's own services - for example, API endpoints, email addresses, monitoring tools, or error reporting services that point to the integrator's infrastructure rather than yours.
If there is any ambiguity around code ownership, address it before the integrator's access is removed. It is much harder to resolve these questions after the relationship has ended.
Final Thoughts
Transferring an Odoo.sh project is not something you do every day, and that is exactly why it is easy to miss things. By following a structured approach - starting with repository ownership and working through access, credentials, backups, security, documentation, and a formal sign-off - you can make sure the handover is clean and complete.
The goal is simple: when the transfer is done, your company should be fully self-sufficient, with no lingering dependencies on the previous partner.
If you are planning a transfer and want help making sure it goes smoothly, feel free to get in touch. We work with businesses worldwide running Odoo and can guide you through every step.
Get in touch with us: